


Free Click & Collect
Within One Hour

Reading time: 8 minutes
Dry-lining is a construction method that helps you create smooth, finished surfaces. This could be on ceilings and walls.
Unlike traditional methods that use wet materials, dry-lining uses plasterboard. These boards are fixed to a wall with either nails, drywall screws, or plasterboard adhesive, depending on the application. With that, you get a clean, even surface ready for painting or wallpapering.
This method offers several benefits over wet plastering; It’s considered to be more cost-effective, and you don't have to factor in drying time, which makes the process much faster. This can reduce the project timeline and the mess on the building site.
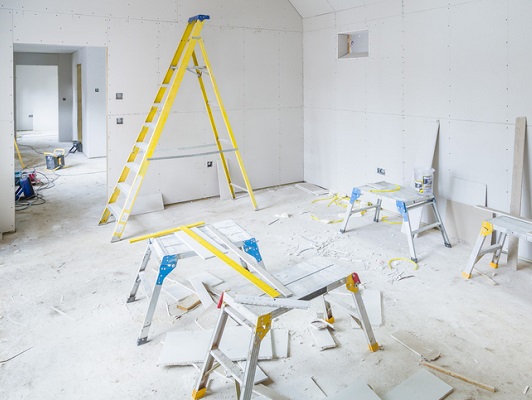
You'll need some essential tools and plastering materials for dry-lining to get the job done.
Plasterboard: these are large boards that form the walls or ceilings. Always choose the correct thickness when you're working on a project.
Timber studs: this is the framework that holds the plasterboard.
Insulation: using good thermal or sound insulation between the studs is great.
Drywall screws: these are designed specifically to fix the plasterboard to the framework.
Jointing compound & tape: used to make seamless joints between plasterboard sheets.
Taping tools: trowels and knives are used to apply and smooth the jointing compound.
Utility knife: this is useful when cutting the plasterboard accurately to size.
PPE: you may need to use personal safety equipment (PPE), such as safety goggles, work gloves and dust masks, if there should be dust flying about.
As we mentioned earlier, the main goal behind dry-lining is to make the walls and ceiling smooth and even. This process involves some key steps:
Step 1: Preparing the surface
The first step is to ensure the surface you're working on is dirt-free. Remove any loose paint, old plaster, or other damaged areas. You might need to apply a levelling compound for very uneven surfaces to have a suitable base.
Step 2: Building the framework
In most cases, you'll need to create a framework to support the plasterboard. You can use timber studs for this. Attach the framework to the wall using screws.
Step 3: Adding insulation (Optional)
This step is optional. But if you want to improve the sound or thermal insulation, adding insulation materials is great. You can add this between the studs. Mineral wool or rigid foam boards are some common choices.
Step 4: Fitting the plasterboard
Once you're done with step three, it's time for you to measure and cut the plasterboard into the desired size. Lift the boards into position and secure them to the framework using nails or screws.
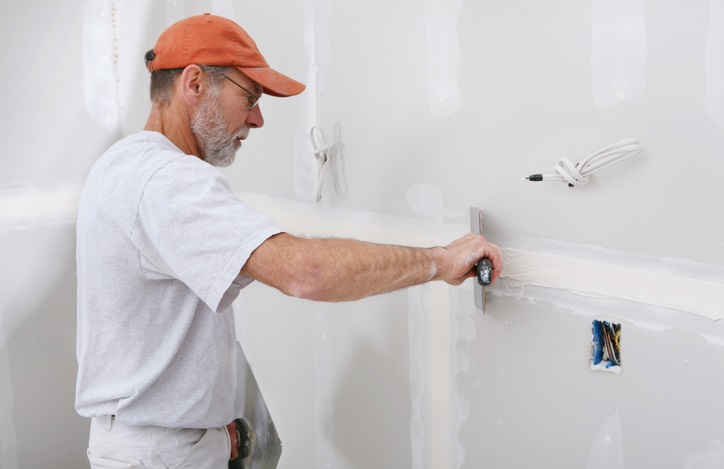
Step 5: Finishing
You'll need to finish the joints after fixing all the boards. Use a jointing compound, which looks like a thick paste, to cover the joints and jointing tape. Make sure you have an even surface. Once dry, sand the areas smoothly, creating a seamless, paintable finish, and apply the tape.
The job role of a dry liner is to create a smooth surface for finished interior walls and ceilings. This work involves some steps to ensure the space for the installation of the plasterboard is ready.
The dry liner ensures the work area is all set by getting rid of other unwanted dirt or fittings. This professional also handles all materials, including plasterboard, metal framing, and jointing compounds.
They're also responsible for measuring and cutting the plasterboard to size. The dryliner does this with the plan in mind to ensure minimal waste.
There are several dry-lining applications if you're a professional working on interior spaces. It's a rapid and efficient way to create smooth, finished walls and ceilings.
Here are some of the typical applications of this construction method:
Dry-lining is ideal for covering existing walls, hiding uneven surfaces, or upgrading insulation and soundproofing.
Lowering ceilings or creating smooth, level ceilings is easily achieved with dry-lining. This can allow you to hide unsightly beams or pipework.
You can use it to divide rooms and create partitions quickly. It's also useful in new internal spaces within a building.
Dry-lining is a great way to build new walls or renovate existing ones. You'll have to use plasterboard for the surface, with timber studs to provide support.
You can also add insulation to the structure to increase thermal performance and lower noise levels. dry-lining walls provide a robust, lasting surface, making them excellent for busy parts of a home or building.
Dry-lining ceilings are particularly effective when concealing wiring or pipework in the ceiling space. It also involves attaching specialised ceiling plasterboards to a supporting grid structure. This method has various advantages, including increased aesthetics and the opportunity to produce unique decorative pieces.
NVQ certification shows your skills and competence as a dryliner. Clients and employers increasingly value it, as it goes a long way to show you're a professional. To obtain an NVQ certification, you must undergo practical assessments on a construction site and complete knowledge-based tests. This certification helps build your portfolio and recognition in the industry and can lead to better job opportunities.
The Construction 2025 strategy encourages the use of certified workers to improve industry standards.
There are different levels of NVQ dry-lining certification. Here's a quick overview of these levels:
Level 1: this relates to health and safety in a construction environment, you can then go on to specialise in dry-lining.
Level 2: the practical tasks here are more complex, but you'll gain a good understanding of the work.
Level 3: the tasks and scope of training become even more complex. You'll work with less supervision.
Level 4: you'll gain specialised knowledge in a particular area of work at this certification level. This level is ideal for managing others or performing technical roles.
Level 5: This NVQ certification level develops you to have a deep understanding so you can handle difficult situations and gain expertise. It covers senior management.
Level 6: it's designed for senior managers, and you'll gain detailed field knowledge. It's equivalent to an undergraduate degree in the industry.
Level 7: this level is the highest NVQ certification, proving you are an expert. Like having a master's degree, this certificate is intended for senior leadership.
As you successfully complete each NVQ level, you will be able to apply for a specific CSCS card relating to your certification, knowledge, and experience.
Dry-lining has some benefits over traditional plastering.
Speed: dry-lining is significantly faster than traditional plastering, with no drying time needed
Versatility: dry-lining can create smooth walls, ceilings, and partitions
Cost-effective: it is less labour-intensive and generally more affordable than plastering
Insulation: this method allows you to add thermal and acoustic insulation within the structure
We've covered a lot in the past few minutes. We want to round up the article by answering two questions we've been asked on this topic.
Plastering uses layers of wet plaster applied directly to the surface. dry-lining uses large, pre-made plasterboards that are attached to a frame.
The main stages include preparing the surface, building a support framework, adding insulation (which is optional), fixing the plasterboard, and finishing the joints.
Disclaimer: the information contained on this page is intended as an overall introduction and is not intended as specific advice from a qualified professional. Installation may differ from project to project.